Prerequisites
Knowledge of creating EC2 instance.
Configure CentOS 7
STEP 1 :
Launch terminal of CentOS EC2 instance by using private key file.
Note : Private key file publicly not visible. set it
chmod 400 <privatekeyfile>
connect terminal by using
ssh -i <path to privatekeyfile/privatekeyfile.pem> centos@<elasticIP>
or
ssh -i <path to privatekeyfile/privatekeyfile.pem> centos@<public dns>
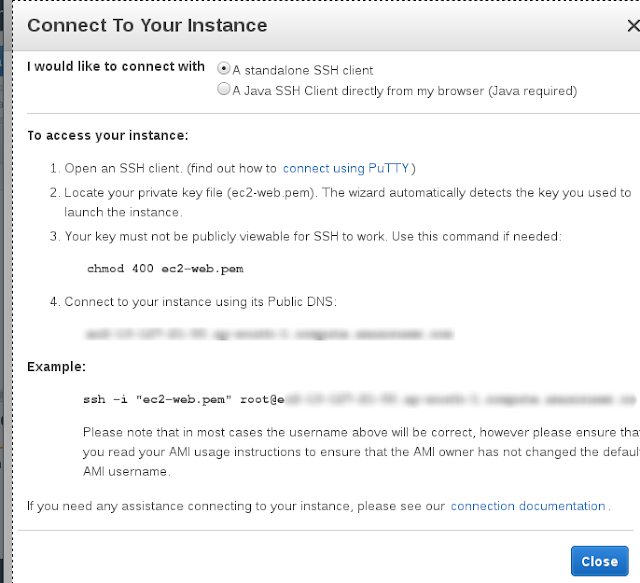
Note 2 : You can get this information By Clicking on connect button of ec2 instance web console
Note 3 :

|
Information about connection
STEP 1 : $ sudo yum -y update
Step 2 : Download latest version or required version of jdk
$ wget --no-check-certificate -c --header "Cookie: oraclelicense=accept-securebackup-cookie" http://download.oracle.com/otn-pub/java/jdk/9.0.1+11/jdk-9.0.1_linux-x64_bin.tar.gz
Step 3 : extract tar file in your software installation directory , I preferred /opt
$ tar -xvzf jdk-9.0.1_linux-x64_bin.tar.gz --strip-component=1 -C /opt/
if we don't want to extract jdk tar file /opt directory then we can extact it other place and create a soft link by using following command
$ ln -s <place where jdk is extracted> /opt/java-latest
it create a directory inside /opt name java-latest
Step 4 : Configure PATH and CLASSPATH Variable
if we required system wide change then we use /etc/profile file otherwise we ~/.bash_profile
########JAVA Enviornment Variable ########
export JAVA_HOME=/opt/java-latest
export PATH=$PATH:$JAVA_HOME/bin
export CLASSPATH=.:$JAVA_HOME/jre/bin:$JAVA_HOME/lib:$JAVA_HOME/lib/tools.jar
Step 5 : test JAVA
$ java
$ javac
Step 6 : If more than one java version is install then we can alternatives command to set current version.
Step 7 : install apache
- $ yum -y update
- $yum -y install httpd
Step 8 Install tomcat
- Create Tomcat User and group - which will be used to run tomcat services
- First we create new tomcat group
- $ sudo groupadd tomcat
- now we create tomcat user with home directory where we installed tomcat and with shell /bin/false(so nobody can login this account)
- $ sudo useradd -g tomcat <-G secondary group if required> -d <where tomcat is extracted i.e. tomcat home directory> -s /bin/false tomcat
- we can check result of above command in for user /etc/passwd and for group /etc/group
- Now we download tomcat latest version using wget
- extract tomcat
- $ tar -xvzf <path to file> --strip-component =1 -C /opt/tomcat-latest
- now setup permissions
- sudo chgrp -R tomcat conf
- sudo chmod g+rwx conf
- sudo chmod g+r conf/*
- now made tomcat user owner of work , temp ,logs, and webapps directories
- sudo chown -R tomcat /work /temp /logs /webapps
- configure tomcat-user.xml for login
- create user name and password in it
- create auto run service in centos 7 in /etc/systemd/system/tomcat.service
- reload systemd to load tomcat unit file
- $ sudo systemctl daemon-reload
- now we can start tomcat services with systemctl command
- $ systemctl start tomcat
- $systemctl stop tomcat
- $systemctl restart tomcat
- auto run tomcat
- Deploy war file by using web console of tomcat or copy war to webapps directory
Crontab
To restart tomcat8 when it's not running, I set a cron job running /var/lib/tomcat8/cron/launch.sh as root:
#!/bin/bash

ps -ef | grep catalina.startup.Bootstrap | grep -v grep > /dev/null
if [ $? != 0 ]
then
   echo "tomcat is not running..."
   systemctl start tomcat > /dev/null
else
   echo "tomcat is running..."
fi
Cron runs every minute:
[root@sf ~]# crontab -e
* * * * * /var/lib/tomcat8/cron/launch.sh
Now Connect Apache and tomcat with mod_jk
|


No comments:
Post a Comment